Wednesday, September 22, 2010

Straight From The Pig's Mouth


A little ways back Dave had a post that was inspired by many of the rib feasts I cook up during our university daze in the Brick'Tangle. Well the local grocery store had baby back ribs on sale and I couldn't resist the meaty goodness. Amazing ribs are extremely easy and actually require minimal effort, a little bit of technique, and a huge amount of passion for deliciousness. This is a very adaptable guideline and you can get super creative with it, but my special rib formula is pretty spectacular if I do say so myself and definitely worth a try.


First order of business in making the best damn ribs you've ever eaten is to remove the membrane. The membrane is a thin, tough skin on the underside of the ribs. The membrane makes for shitty ribs in my opinion so it is best to remove it. To get this son-ofa-bitch off the meat, find a little unattached flap of the membrane near the wide end of the ribs, or make an little slice into the meat near a bone. Try to work the tip of your knife under it by running your knife back and forth in and pulling at the membrane. Once the skin starts to separate, gently yet firmly pull it away from the meat. The pictures below do a pretty good job of illustrating this. Using a paper towel for grip helps if your hands get slippery.


Once the membrane has been removed, it is time to season the meat. I use a dry rub with a variety of spices to build a sweet, savoury, and spicy flavour. These are approximate measurements and should make enough rub to cover both sides of two racks of ribs:

2 tbsp paprika
2 tbsp finely ground coffee
1 tbsp chili powder
1 tbsp dry mustard
1 tbsp garlic powder
1 tbsp onion powder
1 tbsp sea salt
1 tbsp fresh ground black pepper
1 tbsp brown sugar
1 tsp cumin
1 tsp ground coriander seed
1 tsp dried oregano
2 tsp chili flakes


Preheat your oven to 275 degrees. Yes, that low. Rub that spice mix all over both sides of the racks of ribs and place them in a pan that will accommodate the size of the meat. My racks were especially large and I had to cut them in half to fit into my pans, do the same if need be. I found that cutting them in half made the ribs much easier to handle and move about when they were cooked and super tender. You can be pretty resourceful when choosing a liquid to use for braising. Water would suffice, but thats pretty flavourless. I usually opt for some sort of beer, as it creates a fantastic flavour, especially when accompanied by said beer after the fact. I have also used cola, rootbeer, or Dr. Pepper in the past. This time around I used a mix of beer and cola, and it turned out phenomenally. Don't limit yourself to just beer and soda though, as you can literally use any liquid. For a more savoury flavour, use some wine, for a sweeter flavour, use some sort of fruit juice. Add enough liquid that it covers about a third of the meat. Cover the pan tightly with tin foil, and pop it in the oven for 4 hours. Don't even bother peaking, just let it do its thing and enjoy the aroma that will soon overwhelm you. Once the 4 hours is up, your ribs will be tender as fuck and will be in a very delicate state. Peel back the foil, and let them chill out for a bit. Drain the liquid or carefully transfer the ribs to a cutting board. Essentially your ribs are done now, but there is still another step to making these the best damn ribs ever. 


At this point, I like to let the ribs cool for a little while as it helps keep them from completely falling apart into a heavenly pile of meat. For best results, fire up the grill, but if you don't have a grill, just crank the broiler in the oven to high. These ribs will easily be delicious without any sauce, but frankly I like a sweet, spicy, and sticky crust on my finished ribs. I packed my ribs up and took them over to my friend Craig's place where we hit the grill, and he happened to have an amazing selection of BBQ sauces he picked up at the local ribfest, thus saving me time in making up my own. It is best to sauce up the bottom of the ribs and grill them facing upwards first, then carefully flip, sauce up the top side, and let the sauce begin to caramelize. Be attentive to the ribs and the heat as you don't want to char the sauce. By finishing the grilling process with the meaty top facing up, you have room to fit you tongs or flipper under the ribs when they are hot and reach a delicate, fall-off-the-bone state once again. You can do the same thing under the broiler as you can on the grill, just the grill adds that extra smokey, grilled flavour. 


Remove from grill, let them rest again for a few minutes, and then enjoy with beer and good friends. Goes well with coleslaw, potatoes of some sort (mashed, roasted, salad, etc), and maybe some baked beans if you got the time. 


Sorry pup, there won't be any meat left of these bones.


Sunday, September 19, 2010

Feeling Indecisive?

This little website is rather comical, yet if you're feeling indecisive and just want someone to tell you what to make for dinner, it can be very useful. Check it out, good for a laugh and some decent meal ideas.

What The Fuck Should I Make For Dinner?

Tuesday, September 14, 2010

Get Sauced

As promised, I made a little magic in the kitchen last night with those fresh local tomatoes I previously posted about. The end of August and the beginning of September boasts the amazingness of tomato season. The tomato is a very versatile commodity and can be utilized in the kitchen in thousands of ways, but in an effort to keep things brief and concise, I will cut the shit and get straight to the point. This whole blog is based around the premise that delicious does not have to be complicated. In fact, it can be simple as fuck. This here recipe/guideline IS simple as fuck, and everyone should try it/remember this. It can be whipped up really quick, or can be simmered for hours. It is extremely versatile, and although very simple, it can also be very impressive. With the addition of whatever you might need to use up in your fridge, it can become a completely different beast. I speak of tomato sauce, marinara sauce, red sauce, gravy. Call it what you will, its fucking delicious and easy.

I started with a basket for fresh tomatoes, but you can easily substitute them with whole or diced canned tomatoes if you're in a rush/too lazy/it's no longer tomato season.

You will need:
- about a dozen fresh tomatoes (roma/plum or something that isn't too big and seedy)
- 1 onion chopped
- 3-4 garlic cloves chopped
- 1 shallot chopped (optional)
- red chili pepper flakes (optional)
- fresh basil leaves
- parmigiano-reggiano cheese (or something similar)
- olive oil

First, get some water boiling in a pot, and slice an X in the bottom of your tomatoes. Fill a bowl with cold water and ice and situate in close proximity to the pot of boiling water. Once that water is a boil, dunk about three tomatoes at a time in the hot water for 60 seconds, and transfer to the cold water for another 60 seconds using a slotted spoon. 


Once you have dunked all your tomatoes, you can pretty easily peel off all the skins. Using a sharp knife, cut out the stems of the tomatoes, those will make for bad texture in your sauce. Over a bowl, maybe the one you used for the cold water, give the tomatoes a good squeeze and try to get as much of the seeds to squirt out as possible. Don't stress about this too much, but it's a good thing to do. Roughly chop the tomatoes into chunks.


In a large enough sauce pan, heat a couple tablespoons of olive oil over medium heat. Add your onions and cook, stirring frequently until they start to turn translucent. Now add the shallots and garlic, and chili peppers if you please, and continue to cook until everything in your world begins to smell fucking amazing and the onions and garlic start to turn a golden hue. Go ahead, add your tomatoes now. Stir around, throw a lid on that bitch, and reduce heat and allow that shit to simmer for a while. 


You should stir this every few minutes and taste as you go. As your sauce simmers away, season with some sea salt and ground pepper, and you'll probably want to throw in a dash or two of sugar (just a bit, you're not making jam) to balance out the acidity of the tomatoes. I let my sauce simmer for about 30 minutes with the lid on, then about 10 minutes with the lid off. By cooking with the lid on, it keeps the natural liquids in the sauce and helps breakdown the big chunks of tomato. Then with the lid off, the sauce thickens up a little bit as the water evaporates. You could easily skip the lid and break down the tomatoes with an immersion blender if you're in a rush or a lazy fuck, but the sauce tastes better if you let that shit sim-sim-simmer.


As you rock the sauce with the lid off and it starts to thicken up, throw a pot of salted water on the stove, bring it to a boil and get some noodles cooking if this is how you intend to use your sauce. I cooked up some spaghetti, as I find the long, thin noodles the perfect vessel for this velvety, red sauce. As the noodles cook, grab some of that fresh basil, roll it up into a little basil blunt, and slice it. Also, grate the parmigiano cheese with a fine grater. Throw a bunch of the basil and cheese into the sauce and stir it around, but make sure to reserve a bit of each for garnishing.


Once your noodles are all cooked up, add a few tablespoons of noodle water to the sauce. Drain the noodles and divide amongst bowls or plates, sauce it up, garnish and serve.


Enjoy the deliciousness of simplicity. Sorry for cursing.

Thursday, September 9, 2010

What The Falafel?

For those of you who do not know what falafel is, wikipedia will enlighten you:


Regardless of where it was created, and whatever country claims it to be their national snack, it can be concluded that falafel is internationally delicious and everyone should enjoy it. I've been trying to eat relatively healthy lately as I came back from the islands with a few extra pounds, but frankly, dieting is bullshit and I can't deal with eating like a bird. Birds can't be trusted, unless they're roasted and on a plate. So in the effort of healthy yet satisfying eating, I whipped up some falafel last night, but I baked them as opposed to frying them. I served them up with some homemade tzatziki (not very traditional, but delicious) and some tahini-based sauce, on top of a salad with some whole-wheat pita on the side. Despite the air of complexity that this dish gives off, it's pretty simple and has a lot of room to get creative. I highly recommend giving this recipe a try, but do not recommend it for a first to third date. Lots of garlic.


You will need for Falafel:
1 can of chick peas
1 small onion diced up small
3 garlic cloves chopped up real small
3 tablespoons fresh parsley, chopped
1 tablespoon fresh cilantro, chopped
1 teaspoon lemon juice
1 teaspoon olive oil
1 teaspoon coriander
1 teaspoon cumin
1/2 teaspoon lemon zest
Dried red pepper flakes to your liking
2 tablespoons flour
1 teaspoon baking powder
Salt and pepper to taste


These are approximate measurements, taste as you go.


You will need for Tzatziki:
Greek-style yogurt (thicker than regular yogurt)
2 garlic cloves chopped real fine
Handful of cucumber, finely diced or grated


You will need for Tahini based sauce:
Tahini paste
Water
Lemon Juice
1 garlic clove chopped real fine
Fresh parsley, chopped


To get this party started preheat your oven to 375, then drain and rinse the chick peas, throw them in a medium sized mixing bowl, and smash them up real good with a fork, or preferably a potato masher. If you possess the technology you could use a food processor, but do you think they had those in the desert? I think not. Once the chick peas are sufficiently mashed up (!) throw everything else in the bowl and continue to mash about until everything is evenly mixed. Wipe a baking sheet with some olive oil or use some cooking spray to get it nice and greased, then using a spoon, scoop out balls of the mixture, compress into tighter balls with your hand and the spoon, then arrange on the baking sheet. Once you have used all the mix, pop the tray in the oven, bake for 15 minutes, flip when they're a nice golden brown, and bake for another 10 minutes. 


While the falafel gets baked, you should consider it yourself. Also, take the time to whip the accompanying sauces up. Super simple and quick to do. In bowl, mix together the greek-style yogurt, chopped garlic, and cucumber, season with a bit of salt and pepper. Tzatziki sauce done. The let this mellow in the fridge for a bit and the flavours will really come out. For the other tahini-based sauce, mix equal parts tahini paste and water, add a little lemon juice, the chopped garlic and parsley, and some olive oil if its too thick still. Season with salt and pep, and you're done. Super simple and both are super flavourful.


Once you and your falafel are sufficiently baked and golden brown, and you're all sauced up, you now must decide how to serve them. Frequently falafel is stuffed in a pita with lettuce, cucumber, tomato, pickled vegetables, etc. I served mine on a bed of arugula with the accompanying toppings and some pita on the side. Goes well with a traditional hooka session, too.

Enjoy.

Wednesday, September 8, 2010

Home Grown

After reading Dave's post about the deliciousness he served up using local peaches (and delicious it was, I got a jar of that chutney), I was fiending to get some close-to-home grown produce. After living on an island with minimal farms for a year, the idea of eating locally usually meant getting a beef patty at Crandall's. Being back in the motherland, I am even more excited about all the freshness our local soil will be generating this harvest season. I picked up a real nice basket of local tomatoes, a bunch of leeks and a bag of beets that I'm really looking forward to getting delicious with. Yes, beets, those dirty yet vibrantly coloured morsels that turn your pee red and are frequently found in the pickled form. Check back soon for the culinary chaos that will ensue.

Tuesday, September 7, 2010

Hustling Ginger-Peach Chutney


I was reading one of those self help business books and the lesson in a given chapter was to emulate drug dealers. It wasn't suggesting you act all shady or make house calls, but rather that businesses should create something that can be given away in small amounts, only to attract a group of addicts (see: loyal customers) that would come running on a regular basis for a good dose of that ish.

A good drug dealer can probably also teach us a lesson or two in inventory management. A further parallel I would like to explore is that of the fruit farmer and the cook (the latter referring to myself - selling drugs would scare the crap out of me). Dealers, farmers and cooks often find themselves with ample supply at certain periods, and a drought in others.

So go to the market immediately, chat a farmer up, GIVE HIM MAD PROPS for hustling hard enough to get you a delicious basket of peaches (or any other fruit still in season) on the cheap and be on your way to eating sustainably flavourful food through the drought/cold ass winter.

Preserving is a wonderful thing. Last weekend I made a chutney.
Chutney is similar to jam, but it's a bit more of a free-for-all, it uses less sugar and instead incorporates vinegar. Chutney goes on MEAT and FISH and other manly dishes to which you aren't shy to complement with a soft word like chutney.

All my pictures involve the dish I made 2 days later incorporating the chutney, but the tale of chutney making is much more worthy and it goes like this:

Gather:
4 pounds of peaches
1 cup of brown sugar
1 cup of cider vinegar
3 tablespoons of finely chopped ginger
1 Onion, diced pretty fine

First, peel them peaches. Clearly the most painful part of the process, but skip this step and be doomed to sifting through pieces of skin all winter. To get the skin off easily, slit an X in the bottom, dunk them in boiling water for 60 seconds, and then in ice cold water. The skin should come right off.

Core and cut the peaches into some small pieces. They are probably piping hot right now so the multi-tasker in you would be wise to toss the onion, ginger and a bit of the vinegar in a pot in the meantime, at medium heat.

When the onion is cooked down a bit, toss the peaches, brown sugar and the rest of the vinegar in there. Cover and cook for about 15 minutes. Taste it. What does it need? Let the dedication inside you guide your instinct to play with quantities if needed.

Uncover and cook for another 10 minutes to let it thicken a bit.

Let it cool, jar it and give samples to your friends. They'll be offering weird favors in exchange for more. This is your chance to live a bountiful winter my friend!


I added it to a pork tenderloin that was lightly seasoned and grilled. Ate some potatoes on the side with some fresh herbs.

-Dave

Monday, September 6, 2010

Don't beat your meat

Burgers are one of those categories of foods that have entire websites dedicated to their deliciousness, and many arguments have been made over the different ways and best techniques for making burgers. I don't want to stray into this debate just yet, as I can truly appreciate any burger. After 10 months of being on an island free of a fast food chain, I was fiending for a McDonald's cheeseburger. The thin salty patty, the simple arrangement of dressing, and the melty melty cheese has addictive qualities. Yet a thick, juicy, beefy home-grilled patty is amazing and satisfying in a whole different way. I could wax the poetic all day about all the different varieties of delicious that burgers come in, but thus I digress.

The other night, a man-dinner was in order, and to keep things relatively simple Dave and I decided on grilling up some thick beefy burgers, adorned with some flavourful toppings. My philosophy on burgers of the grilling variety is to keep them simple, and let the fiery-beefy flavour shine through. What I mean by this is, don't fuck with the meat. No breadcrumbs, no eggs, no onions, no garlic, no fillers of any sort. Some might disagree, but I want to let the natural beef deliciousness and the accompanying toppings do the talking. This particular night, Dave and I had some ripe avocado, a sexy pound of thick-sliced maple smoked bacon, white onion, aged cheddar, and some leftover chopped tomato that needed some love. Perfect.


First and foremost, I'll start with making the beef patties. We used lean ground beef, but really use whatever you prefer. I personally like medium ground chuck in burgers because more fat equals more deliciousness, but I've obtained a bit of extra marbling from all the cheap Heineken and fried johnny cakes I consumed in the BVI, so I was cutting corners.


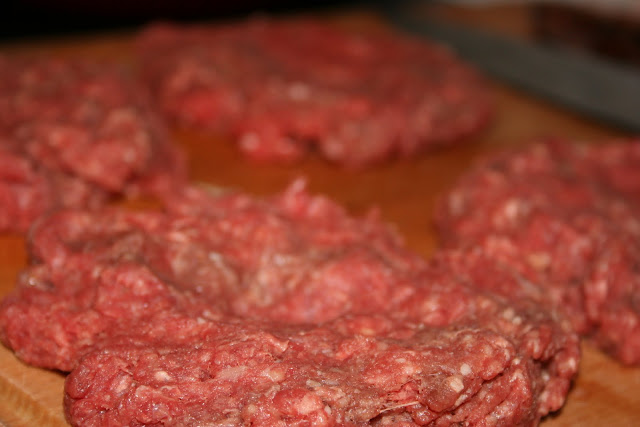
Now you really want to be gentle as possible; caress your meat. Form the meat into loose balls, and gently flatten. Make sure to press a dimple into the middle, as it prevents the burger-ball effect. Don't worry about forming them into perfect shaped, smooth patties. More texture equals more flavour, less beating equals more juiciness. Crack a respectable amount of black pepper over these bad boys and throw them in the fridge if you make them ahead of time, or let them rest up to room temp, we'll get back to these in a bit.


This next little part is very versatile and very delicious. Place the bacon in a large, cold skillet, and start the frying at medium heat. Once getting the bacon to desired deliciousness, drain some of the drippings but reserve a significant amount in the pan and tossed in a large white onion, sliced thinly. Keep the onions cooking over medium to medium-low heat, moving around occasionally. The onions should start to become soft, brown, and smell ridiculously amazing. To caramelize the onions, you need to pay some good attention to them, making sure the heat isn't too high, and be patient. The longer and slower you cook these, the more delicious they get.


Meanwhile, as your onions are coming into their final stages of caramelization, rock your grill up to high heat. When it's piping hot, give your burgers a quick sprinkle of sea salt, and throw them on the grill. Adjust your heat down to medium. The hot grill sears the meat and helps form distinctive grill marks and a delicious outer crust. Be very attentive, you want to on top of putting out flare ups, BUT DO NOT BEAT YOUR MEAT. You may be tempted to move your burger around, squish it, flip it prematurely, but just don't. Get a beer, drink it, and just let it cook for 5 minutes. When the burger releases itself from the grill with little effort, it's ready to flip. Gently flip it, and drink your beer. This side should grill a bit quicker, so have your sliced cheese of choice standing by, and your buns if you like them toasted, which I do.


Before your burgers are done, throw the cheese on top and get it all melted like. Remove your burgers to a plate, and toast your buns. By doing this, you're forced to let your burgers rest up. Like any meat, you should rest burgers for 5 minutes after cooking to let the juices redistribute. 


We dressed these babies up with the caramelized onions, bacon, and avocado, chopped tomato, and a little grainy mustard, but burgers are one of those vessels you can really get creative with. Caramelized onions and bacon are pretty hard to fuck with though. Before the summer truly disappears, definitely try these out. And if you can come up with a flavour combination that rivals caramelized onions, bacon, cheddar and avo, we'd love to hear about it.


Eat up. Party down.