Not exactly a new documentary, but I just stumbled across this on Tha Coop while creeping the blogosphere. Check out the trailer, but the film itself is definitely worth a view.
Friday, October 1, 2010
Thursday, September 30, 2010
Mac-n-Cheese With Steez
This past Sunday I found myself strolling through the Byward Market, simply captivated by all the fresh and local goodness the vendors had to offer. Mallory can attest to the fact that I seemed like a total space cadet as I was overwhelmed by the colours and quantity of the amazing produce that surrounded me. We picked up a bounty of fresh fruits and vegetables, and dipped into the market's cheesemonger to cop some quality dairy products. We ended up walking away with a nice hunk of canadian cheddar and some top quality cottage cheese with aspirations to make some bad ass, homestyle mac and cheese to warm us up after a day walking about in the cold Ottawa drizzle. 'Twas an excellent idea and this is how it went down.


Hustle up:
- 1 lb box of suitable pasta (choose a tubular pasta that will hold the creamy sauce well, like a penne, macaroni, or cavatappi. I used cavatappi, which is also called scoobi doo)
- 1/2 - Full stick of Butter
- 2 Garlic cloves, chopped
- 1 small onion, chopped super small
- 2/3 cup of all-purpose flour
- Can of delicious beer (or a case of further drinking)
- 4 cups (1 Litre) of milk
- One can (354mL) of unsweetened evaporated milk
- 1 lb of good quality medium aged cheddar cheese, shredded
- A couple tablespoonfuls of your favourite dijon mustard
- Tablespoon of paprika (if you can get or got some smoked paprika, give it a try)
- A few generous pinches of chili powder
- Tub of cottage cheese (find some that is pretty thick)
- Sea Salt and Black Pepper
- 1/2 loaf of some sort of delicious italian bread torn into small pieces, preferably from your local bakery
- Splash of Olive oil
Get the oven heating up to 350 degrees. While the cooking box does its thang, boil some salted water and get your pasta cooked to 'al dente', which means its tender, yet still has a bit of bite or density to it. You really don't wanna over cook the pasta as you're cooking it in the sauce later. Should be about 7-8 minutes in the boiling water.

Time to get saucy. In a large sauce pan, or the pot you boiled the pasta in, melt about 1/2 the stick of butter over medium/medium-low heat. Add the chopped onion, cooking until it starts to soften, smells delicious, and become translucent. Throw in the garlic, and continue to cook until everything starts to get a little bit golden. You may need to add a few hunks of butter as the onion will absorb some and you need the butter to make the 'roux'. Add the flour and stir the mix with a wooden spoon until a thick and smooth paste is formed. If it's too doughy add a few more hunks of butter and incorporate. This paste is the 'roux' and it is frequently used for making sauces, so it is good to become familiar with it. The roux is used for thickening sauces as it has flour in it and by combining the flour with butter, it can be evenly distributed throughout the sauce, and ultimately prevents nasty lumps. Continue to cook the roux for a few minutes so it gets all toasty like, thus developing more flavour. Slowly stir in a few big splashes of the beer until the mixture becomes smooth again.
Gradually stir in both milks, then switch your cooking weapon to a whisk, and start whisking that sauce until it is nice and smooth. Continue to whisk (if you have pansy wrists, switch with a friend) and whisk for several minutes until that sauce is pretty thick.

Now its really time to party. Stir in the cheese, dijon, paprika, chili powder, and a good dash of salt and cracked pepper.

Add the cooked pasta into the cheesy sauce of goodness, and stir to get everything nice and sloppy. Pour the sauce/pasta party into a big ass casserole dish, something like 9"x13, or a couple smaller dishes, ooor if you're fancy enough to have a individual oven proof ramikans (fancy for bowls), you can use those, too.

Spoon nice dollops of cottage cheese all over the top of the noodle party and crack a little more black pepper over top. Proceed to toss the bread chunks with a splash or two of olive oil, and then spread it out over the pasta.

Throw it in the cooking box and bake until it is heated through and the top is sexy and golden brown, approximately 30 minutes, but it really depends on the size of the dish used.

When I cooked this up, I used a mix of a medium aged cheddar, and some extra old cheddar (both Canadian, yay local food!) for nice sharp cheese flavour. You can definitely mix it up with whatever type of cheese you want, and you can even throw in some meat like cooked sausage, ham, BACON!, ground beef, or mix in some small chunks of cauliflower, broccoli, or whatever veges you have on hand. Serve with a nice green salad, and get dedicated.


True Dedication
Not too sure where this commercial is from but I discovered it via my facebook news feed. This Panda is so dedicated to deliciousness that it makes me well up with tears. I don't understand how people don't like cheese. It makes so many things so much tastier. I have always said, you shouldn't trust a person who doesn't like cheese. I have yet to be proven wrong.
Definitely check out the link, as the video won't let me embed it into this post.
Definitely check out the link, as the video won't let me embed it into this post.
Monday, September 27, 2010
Get Sauced, Get Squashed and Win a Free Bowl

Thanks to J's post on the making of the perfect sauce, and how to get optimally sauced in the process, you're now slightly better versed in staple party starters.
College girls, carb seekers and Microwave dinner eaters will think you're the best shit since sliced bread, but you don't quite have all your bases covered.
Dieters, Celiacs & Hard-Core Foodies can join your fork-twirling celebration if you substitute the actual pasta.
One of fall's greatest contributions to our diet, especially in Canada, is the many varieties of squash.
The obvious choice here is Spaghetti Squash. It makes the dish healthier, easier and more delicious. The sweetness of the squash is enough to enjoy on its own. Coupled with a solid sauce, you're just a hop, skip and a stumble from flavour country.
Forage the following:
- Uncle Justin's Swanky Sauce
- A Spaghetti Squash (a small one will serve 2 hungry people, a large one will serve 4)
The squash will take about the same time to get its delicious on as the sauce, so pop it in the oven as you first start cooking down your tomatoes.
With your sharp ass knife (good luck without it) slice the squash in half lengthwise. Grab hold of your favorite scooping apparatus and scoop out the seeds and that membrane-like substance.
Drop it in the cooking box at 375 for 45 minutes, flesh facing up.
Tend to your sauce and to your guests in the meantime.
When it's all said and done, remove the squash, grab a fork and shred the squash out.
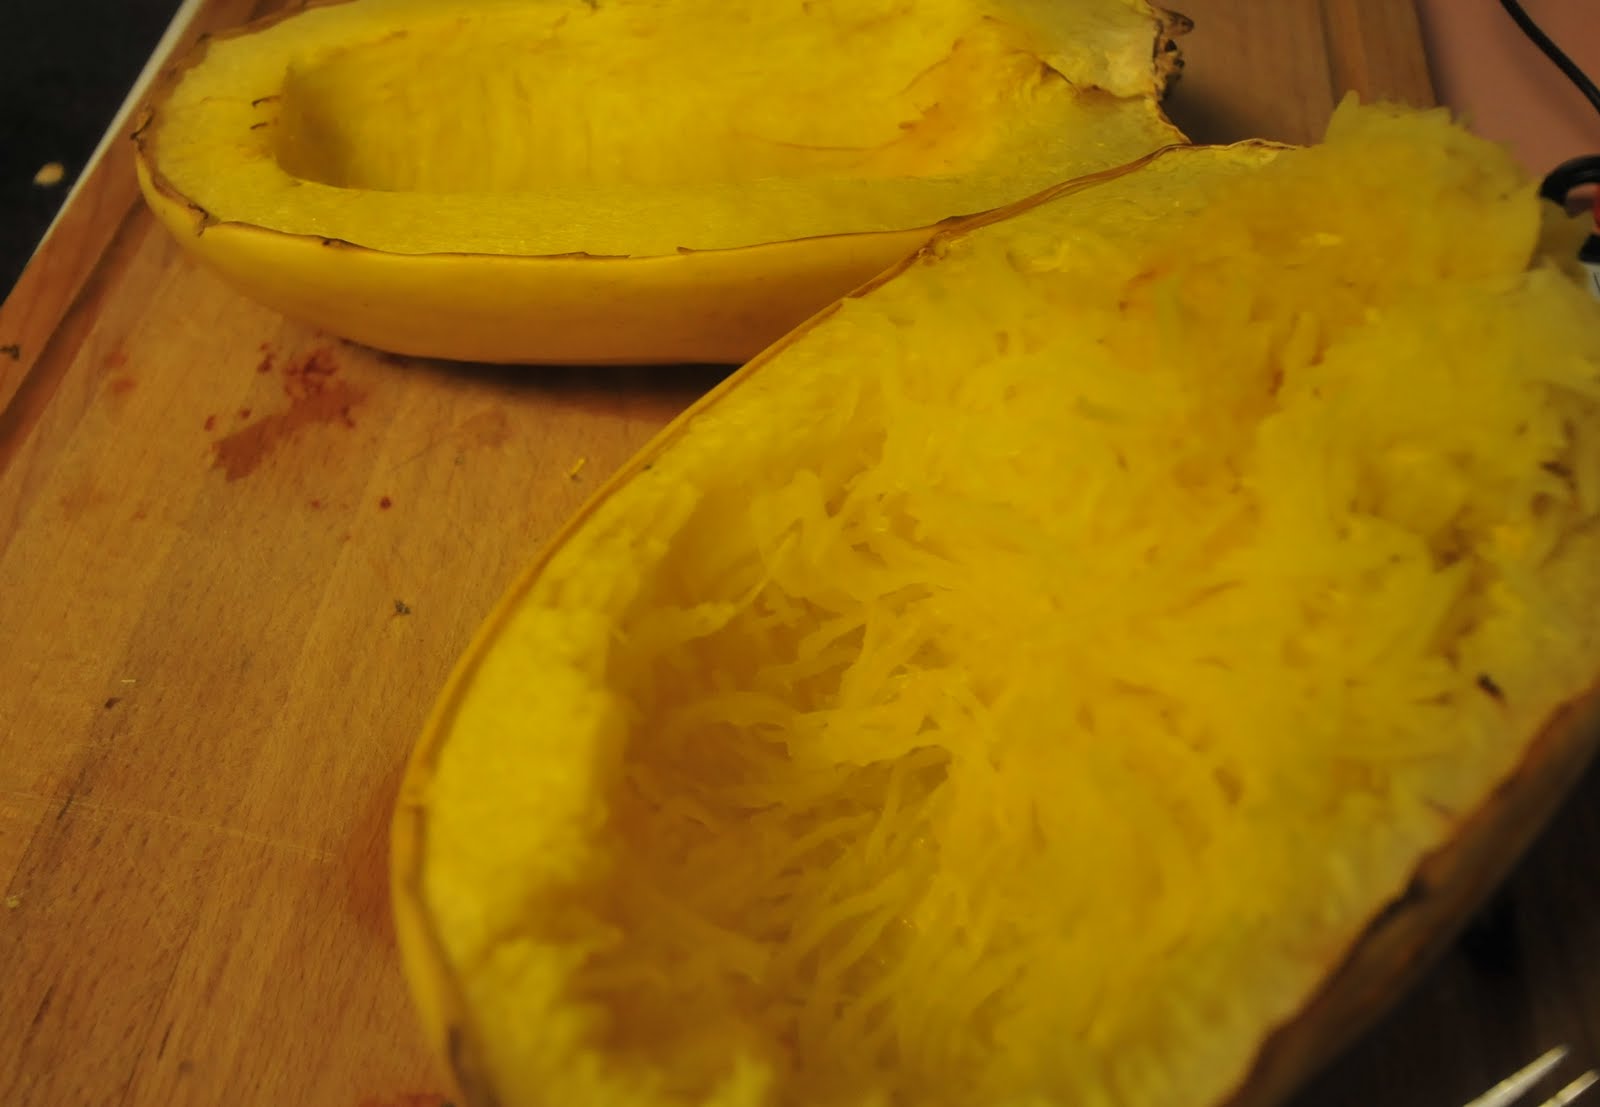

Toss it in a bowl/plate and apply J's sauce. If you're too broke-ass for a bowl, shred the squash right in its skin and toss the sauce in there (see: College).

Sit down, enjoy some cocktails and share a few laughs about how much everybody can't get enough of your sauce.
- D
Thursday, September 23, 2010
What the F*** Is This?: The Do’s and Don’ts of returning Food

This little piece diverges from the traditional recipes we usually throw down. It is inspired by two things:
1. A real-life event. A meal that was subpar by a mile and a somewhat sticky situation in which I swallowed my pride and just ate the food.
2. A website that I have been following closely lately. http://artofmanliness.com/
The Art of manliness is entertaining to see the least. But it serves a greater, almost philanthropic cause, which is to educate men on how to be better men, for the greater good of society. The Art of Manliness lists several etiquette principles, some of which are related to the dinner table.
Learning how to eat well is a beautiful thing. The downside is that it opens your eyes to the extent to which the average North American has not yet realized this… The “Dedicated” individual finds him/herself subjected to a plethora of suddenly unsatisfying meals. So when is it right to push the plate away and raise a red flag to your waiter? And how do you do it politely? I have worked in the restaurant world and ate in my share of eateries. I’ve seen a fair share of both appropriate and inappropriate diners.
I was recently at a work function (I.e. The bill was taken care of for me) and had a terrible meal. I ordered Mushroom Risotto. I was served Orzo pasta in a mushroom sauce that may as well have come from Campbell’s. There are many things wrong with passing off Risotto as Pasta, none of which were bad enough to be a dick about it in front of my boss. I ate a fair portion, told the waiter it was ok (it really wasn’t. It was terrible) and mentioned that I would have preferred a more traditional Risotto. It inspired me to write the following list.
The following is a list of Do’s and Don’ts. It is by no means exhaustive so please add your own by commenting.
1. DON’T make a big deal of it when somebody else is paying, especially if they are eating the same thing and seem satisfied with it. If you are really unsatisfied, probe the bill payer a bit to see how they are feeling and assess whether you want to go there.
2. DON’T do it to get a free/cheaper meal. If you are that cheap, stay home on your plastic covered couch and watch the latest movie you downloaded for a good time.
3. DON’T get pissed at the waiter. He didn’t make your food. Even if he did or if he took the wrong order, your new dish won’t get made any quicker. A courteous customer is one that the restaurant will want to have back again. If anything, politeness will likely score you more food and drinks in the long run.
4. DON’T return food for not measuring up to your standards when it comes as a combo for 10.99.
If there is a hair in it, it’s fair game send back. But don’t return the zucchini fritters at your local diner for being too greasy. You will just seem like a pretentious tool.
5. DON’T return your food if you made the dish overly complicated via customization, you are part of a group and yours didn’t turn out just right. Restaurants have menus for a reason. The Chef likes to do it that way, and he does it best that way. He has a routine. If he has 20 plates to serve in 5 minutes and you throw him an unnecessary curve ball, be prepared to deal with the consequences.
6. DO seem casual and approachable about it. Kindly mention that you are happy to have the extra time to enjoy the beautiful company you are with and that you would love to do so over another round of drinks. See #3 for the causal relationship between courtesy and free shit.
7. DO ask your comrades how they like their meal. If you have stumbled upon an average joint, they are still likely to do a few things well. Hopefully somebody at your table hit the jackpot and will recommend you order that for a safe bet.
8. DO tip your waiter on the full amount of the bill, if items were sent your way on the house. If the restaurant made amends for the mistake, and you got yourself a delicious meal, the waiter likely worked hard to plead your case to whoever signed off on the free shit. Tip him well.
DO let us know if you are stoked on this post. If you are thinking: “why the hell are you telling me this? I read your blog for recipes. Don’t bore me with your etiquette shit. That’s why I subscribe to GQ”, then DO feel free to return it via commentary as well.
Always be polite (swearing is necessarily impolite)
- Dave
Wednesday, September 22, 2010
Cleaning Out The Kitchen
In my opinion, kitchen gadgets are pieces of shit that are targeted towards people looking for quick and easy ways to cut corners in the kitchen. For the most part, these kitchen gadgets take up a lot of precious counter and cupboard space, loose their novelty after three uses, and don't even work very well. So why the fuck do people buy them? Because they are marketed in such a way that they seem to make a "difficult" kitchen task into a quick and easy one. Well it's usually bullshit, with the exception of two gadgets that I will admit to owning. First being an ice cream maker (ice cream recipes to come), which has been used plenty of times and continues to be used and is made by a quality manufacturer of kitchenware, so it hardly classifies as a gadget and more of an appliance. The other gadget being a magic bullet, which serves its purpose as a small blender/ spice and herb grinder, but you will never catch me making something from that 10-second recipe book. Anyway, I'm straying from the point of this post. You can do anything in the kitchen much better than a shitty slap-chop or an over priced panini press can with tools you likely already have. Instead of paying for a slap-chop, invest in a good knife and a steel or sharpening stone and practice using them. Instead of dropping hard earned cash on a panini grill, buy a cast iron skillet and stop playing about.
Cast Iron is amazing for cooking with as it distributes heat evenly, retains heat well, creates a non-stick surface if seasoned correctly, and requires minimal care. In fact, you hardly have to wash it. No wonder people have been cooking with it before I care to think about. They're relatively cheap and even better if you can find a used one at a garage sale or second hand store.
So, I'm running off on a tangent again, lets skip to the point already. Instead of using a panini press to make a delicious and melty sandwich, grab a heavy pan, like a cast iron one, and a stack of other frying pans, pots, or whatever has some weight and is close by. Paninis are simple things. You need some quality bread, a cheese that melts nicely and your selection of fillings. I managed to find some sliced smoked turkey, prosciutto, arugula, avocado, apples, goat cheese, provolone, and smoked gouda in my fridge. There were lots of other things in the fridge but I thought these would make for some interesting sammies. I placed the cheese right on the each piece of bread so it gets the most heat and melts fantastically. Place the rest in the middle, close the sandwich, and set it in that heavy pan you got heating up. Butter your bread on the outside if you feel it necessary. I chose not too as I had some pretty delectable ingredients that didn't need much improvement. When you got your sandwich in the pan, get a stack of other pans and just stack them on top of your sandwich. I used another skillet and a heavy kettle to press my sandwich. Let it cook for a minute, give it a peak make sure its browning and melting real nice.

Flip that sammy when it looks nice, and continue to grill on the opposite side with the pans back on top. When that side is golden brown and your cheese is melted, remove from the pan, slice in half and serve with some sort of delicious dipping sauce, and vow to never waste time or money on a useless kitchen gadget while you revel in the enjoyment of eating the easiest panini ever.

Panini with Prusciutto, Smoked Turkey, Provolone, Goat cheese, Avocado and Arugula

Leaning Tower of Panini: (1st & 3rd layer) Provolone, Grilled Chicken, Goat Cheese, Arugula. (2nd & 4th layer) Smoked Gouda, Apple, Grilled Chicken, Goat Cheese.
Straight From The Pig's Mouth
A little ways back Dave had a post that was inspired by many of the rib feasts I cook up during our university daze in the Brick'Tangle. Well the local grocery store had baby back ribs on sale and I couldn't resist the meaty goodness. Amazing ribs are extremely easy and actually require minimal effort, a little bit of technique, and a huge amount of passion for deliciousness. This is a very adaptable guideline and you can get super creative with it, but my special rib formula is pretty spectacular if I do say so myself and definitely worth a try.


 2 tbsp paprika
2 tbsp finely ground coffee
1 tbsp chili powder
1 tbsp dry mustard
1 tbsp garlic powder
1 tbsp onion powder
1 tbsp sea salt
1 tbsp fresh ground black pepper
1 tbsp brown sugar
1 tsp cumin
1 tsp ground coriander seed
1 tsp dried oregano
2 tsp chili flakes
Preheat your oven to 275 degrees. Yes, that low. Rub that spice mix all over both sides of the racks of ribs and place them in a pan that will accommodate the size of the meat. My racks were especially large and I had to cut them in half to fit into my pans, do the same if need be. I found that cutting them in half made the ribs much easier to handle and move about when they were cooked and super tender. You can be pretty resourceful when choosing a liquid to use for braising. Water would suffice, but thats pretty flavourless. I usually opt for some sort of beer, as it creates a fantastic flavour, especially when accompanied by said beer after the fact. I have also used cola, rootbeer, or Dr. Pepper in the past. This time around I used a mix of beer and cola, and it turned out phenomenally. Don't limit yourself to just beer and soda though, as you can literally use any liquid. For a more savoury flavour, use some wine, for a sweeter flavour, use some sort of fruit juice. Add enough liquid that it covers about a third of the meat. Cover the pan tightly with tin foil, and pop it in the oven for 4 hours. Don't even bother peaking, just let it do its thing and enjoy the aroma that will soon overwhelm you. Once the 4 hours is up, your ribs will be tender as fuck and will be in a very delicate state. Peel back the foil, and let them chill out for a bit. Drain the liquid or carefully transfer the ribs to a cutting board. Essentially your ribs are done now, but there is still another step to making these the best damn ribs ever.


At this point, I like to let the ribs cool for a little while as it helps keep them from completely falling apart into a heavenly pile of meat. For best results, fire up the grill, but if you don't have a grill, just crank the broiler in the oven to high. These ribs will easily be delicious without any sauce, but frankly I like a sweet, spicy, and sticky crust on my finished ribs. I packed my ribs up and took them over to my friend Craig's place where we hit the grill, and he happened to have an amazing selection of BBQ sauces he picked up at the local ribfest, thus saving me time in making up my own. It is best to sauce up the bottom of the ribs and grill them facing upwards first, then carefully flip, sauce up the top side, and let the sauce begin to caramelize. Be attentive to the ribs and the heat as you don't want to char the sauce. By finishing the grilling process with the meaty top facing up, you have room to fit you tongs or flipper under the ribs when they are hot and reach a delicate, fall-off-the-bone state once again. You can do the same thing under the broiler as you can on the grill, just the grill adds that extra smokey, grilled flavour.


Remove from grill, let them rest again for a few minutes, and then enjoy with beer and good friends. Goes well with coleslaw, potatoes of some sort (mashed, roasted, salad, etc), and maybe some baked beans if you got the time.


Sorry pup, there won't be any meat left of these bones.
Subscribe to:
Posts (Atom)